
Leader
Summer 2022

We know that as a marketer your job involves wearing many hats, some hats that you didn’t expect to have on. These skills gaps can sometimes impact your want to create campaigns that match the expectations of your brand, and sometimes can cause a lag in getting campaigns out the door. Ever wondered about that code that makes your emails beautiful but are too afraid to look into the backend? This blog post will break down the simple tweaks you can make without the need of an engineering or design team.
The structure of most HTML elements within an email are as follows looks just like this:
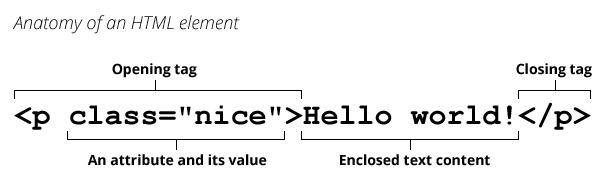
This is a paragraph tag. Sometimes the structure of the element might look like this:
<p class=”nice” style=”font-size:12px; line-height:24px;”>Hello world!</p>
So what’s the difference between the two styles of html?
The difference between these tags are the ‘inline styles’ which are defined by the ‘style=’ attribute.
The majority of websites you visit will use classes as they mean less amount of code and can be reused multiple times through different elements. Emails often use older HTML standards and the on-going battle with rendering across browsers and devices means the majority of email developers use a mix of CSS classes and inline styling. (Note: CSS classes are usually required for mobile content responsive templates). So as you can imagine, this can get very confusing when you just want to change the size, colour or font of a campaign email.
So, now that we have the basics of the DNA of your email, we can address the hurdles that stop you from tweaking the structure of it to suit the campaign aesthetic. We know that not everyone has a basis in html, so this will work to give both in-depth and quick-to-action information:

To add links around copy, you must first wrap the text in an anchor tag. In HTML a link tag is defined by the <a> tag. The structure of a link tag looks something like below:
<a href=”https://www.ometria.com” target=”_blank” style=”text-decoration:none; color:#000001;”>click here</a>
There are 2 attributes above which may not be easy to figure out. Below we’ll talk through how to find them and what they do to make your emails work.
<a href=”https://www.ometria.com” target=”_blank” style=”text-decoration:none; color:#000001;”>click here</a>
<a href=”https://www.ometria.com” target=”_blank” style=”text-decoration:none; color:#000001;”>click here
This is important to include and you need to make sure it’s set as _blank”. This will make sure that the link is opened in a new tab instead of the ‘default browser behavior’ which means the window will open on that current page (instead of creating a new one).
<a href=”https://www.ometria.com” target=”_blank” style=”text-decoration:none; color:#000001;”>click here
The second noteworthy attribute is the inline style tag. Here we are using inline CSS to override the default browser behaviour and ensuring consistent rendering across all devices and browsers; when not done, this looks like the images on your mobile campaigns not loading.
The text-decoration is set to none. This stops the linked text from being underlined, if you’d prefer the text to be underlined you can set this to text-decoration:underline; instead.
The second CSS declaration is the colour tag. This needs to be added to every text links some browsers and devices will default linked text to blue, the inline colour override ensures your linked text stays the colour you expect across all devices, as in our example color:#000001, with use of hex codes to give your desired colour. It’s important to note that this CSS declaration is required for all links, regardless of the colour from the surrounding copy.
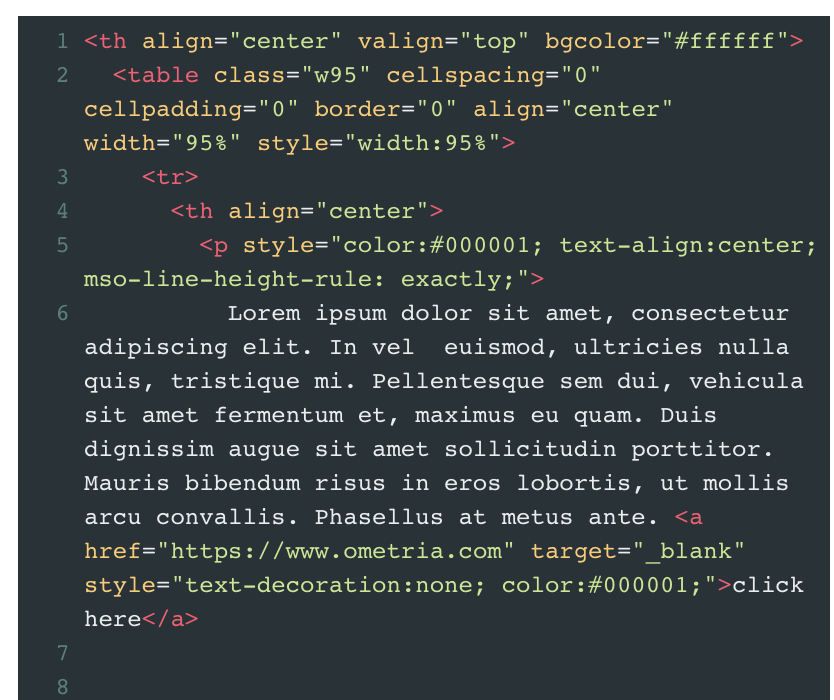
This is what all of the above may look like in the backend of your email:
Styling text is structured in a similar way to a link tag, however for this example we will use the <span> tag instead; it’s worth noting that the paragraph <p> tag can also be used. Your templates may be using a mix of span and p tags. The good news is <span> and <p> is well supported across the majority of devices and browsers, allowing you to add inline styling to text:
<span style=”font-size:14px; line-height:1.2; color:#ff0000; font-weight:bold; ”>This text is red</span> or <p style=”font-size:14px; line-height:1.2; color:#ff0000; font-weight:bold; ”>This text is red</p>
As you’ll notice the above span tag is using an inline style tag, similar to the link tag example. Although similar, it’s worth noting that they do very different things. The inline CSS for this tag example is doing the following:
When you begin to make changes to the text styling, you should notice this update immediately within your email. Your tag needs to be closed correctly </x>, otherwise you risk breaking the email template. Within Ometria, we offer a rich text editor block that allows you to edit and manipulate text without needing to get into the HTML code.
Throughout this section, we’ll be editing a CTA, as they feature in nearly all emails. The code is also applicable to larger changes, but we’ll focus primarily on small, fast and easy-to-do actions.
HTML buttons are easily editable, you can change the background colours, text styling and button length. Below we detail how to make these commonly required button changes.
When you first click on a CTA to edit, you’ll notice a ‘bgcolor=’ attribute. This attribute will hold a hex value. In the example below it’s #000001. The easiest way to set the background colour is to search for the hex code within the block.
Dependent on your computer, pressing ctrl+f or cmd+f and typing in the hex code will highlight the code that needs to be changed. It’s important to note that hex values must always contain the # symbol followed by six digits. A missed symbol or less than six digits will mean your email won’t show as expected.
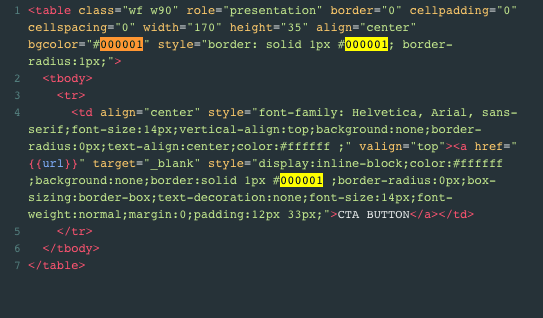
You’ll notice in the screenshot example that although bgcolor is defined only once, we have 2 instances of the border declaration. The first instance of border – just after bgcolor – is used to set the border colour around the CTA and in most cases this will need to be set to the same colour as the button bgcolor. However, if you’re creating a white button with a black border, you’d set the border here as #000001 and the bgcolor as #FFFFFF.
The second border selector within the <a> tag is used to prevent the button from ‘collapsing’ on your customers who use Outlook as their email provider. It’s important to note that the border within the <a> tag must be set to the same colour as the button background, if this is not set as the same colour you may see a double border on the button. It’s small instances like this that can be especially frustrating when you’re hoping to make quick minor changes without too much coding involved.
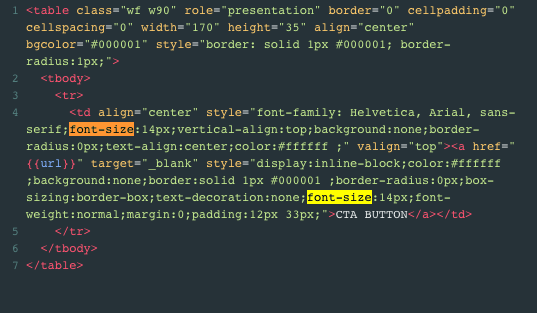
The font colour can be changed by updating the hex code for the color, this looks like #XXXXXX. In the screenshot below you’ll notice 2 areas to update. The first colour declaration is within the <td> and the second is inside the <a> tag. This is important. Both <td> and <a> need to be updated if you want to make a successful style change to your font.
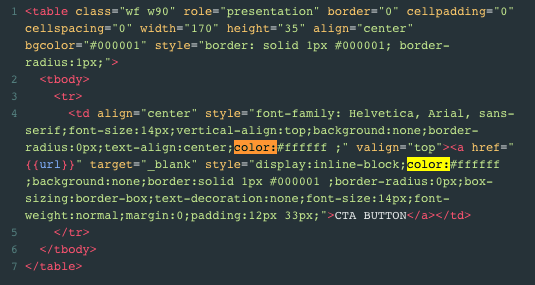
The font size can be changed by updating the ‘font-size:’, as mentioned earlier in the blog, CSS and html are easy to read. As with changing the font style, both <a> and <td> need to be updated.
The final most common button update is changing the font family. There is one declaration of font family within the template. In the example you’ll notice the the font declaration has 3 font styles defined: ‘Helvetica, Arial, sans-serif’
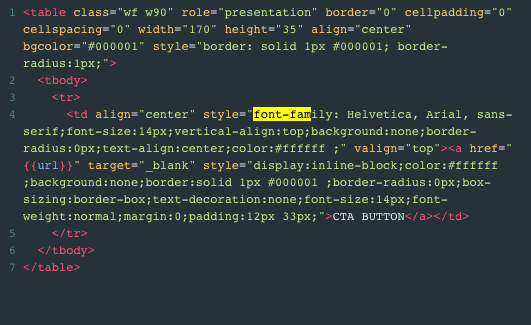
The fonts are declared in a ‘font stack’ to ensure graceful fallback if the main font isn’t supported. For example in the screenshot above the system will first look for Helvetica, if this isn’t found on the system it will fallback to Arial, if Arial can’t be found it’ll default to a system sans-serif font. It’s important to declare these fallbacks as the font you’ve defined may not be available on all systems. If you’re using a font which contains spaces in the name, the font name must be wrapped in apostrophes. For example: font-family: ‘Times New Roman’, Arial, sans-serif;
An important note: Custom fonts cannot be used here as the font must be imported into the head of the template first. If you’d like to add custom fonts to your template, you’ll need to speak with your provider customer success manager so it can be arranged.
Images are a vital part of any email and good imagery can make a positive impact on an email campaign. As the majority of devices now have high resolution screens, we recommend using clear and high resolution imagery in any campaigns.
Quick tip for images: A good rule of thumb is to upload a double size image to use in your campaign. For example an image block may have a placeholder image of 600px. To use an image in this block, you should upload a 1200px(600*2) image to use. This will stop you from getting blurry images on desktop and mobile devices; but’s best to aim to keep your image files under 1MB.
GIFs have become a recent staple in emails, adding a dynamic visual element to email campaigns. GIF support is good across the majority of devices and browsers however, there’s a few things to note when using them in your campaigns:
Making changes to email code can seem daunting, especially when you’re not well-versed in html. Using knowledge of key elements of your email DNA, you can spot the most common ‘css declarations’ and be able to make quick, impactful changes to campaigns without a reliance on an engineer or a designer – all taking you a step closer to creating memorable campaigns your customers will love.
Ometria is committed to protecting and respecting your privacy, and we’ll only use your personal information to administer your account and to provide the products and services you requested from us. You may unsubscribe from these communications at any time. For information on how to unsubscribe, as well as our privacy practices and commitment to protecting your privacy, please review our Privacy Policy.


Take the first step toward smarter customer marketing